We didn’t have too far to go from the Beatty RV Park near Death Valley to Las Vegas, just about 120 miles or 2 hours on I-95. This is the first time we have driven to Vegas, we always have flown in the past.
 |
| View as we approached Vegas from the north on I 95 |
 |
| There it is, the RV Park! How do we get in! |
I was a little apprehensive about driving into Vegas and on the strip with our 40 foot 5th wheel. We were going to park at the Circus Circus RV Park just off of the strip. We did fine but it took us about an hour to find out how to get into this park. Actually driving on the strip with the 5th wheel isn’t all that bad. The problem is finding a way in to the park!
 |
| The RV park is just on the other side! |
Our RV Garmin took us to an entrance that was just for cars. And there weren’t any signs for the RV Park anywhere it seemed. Patty tried to call the park and was put on hold the entire time we drove around in circles. We could see the park at times but just couldn’t figure out how to get in. Finally we decided to go farther behind the park where we found a very small sign pointing to the RV Park.
Even after we turned into the entrance we weren’t sure where to go. There are no signs for an office anywhere in the park. So after driving around in the park we asked someone walking around who told us where to go. We showed many people during the week we were here how to find the office.
The Circus Circus RV Park is basically a large parking lot with hookups. The sites are a nice size though and most everywhere on the strip is walkable from there. The park even has a nice pool and hot tub. It is really unbelievable at night to see all of the lights of the strip all around us.
 |
| Our site in Vegas |
 |
| View from our site |
Our main purpose in Vegas was to visit with Patty’s nephew Brian. We are not into low odds Vegas gambling so being on the strip is not all that advantageous for us. Brian lives about 7 miles from where we were and, for the most part, it wasn’t all that difficult getting around.
 |
| Brian in our RV for a visit |
While in Vegas we managed to do a few other tourist type things too. We took in one show, Chris Angel at the Luxor. It was a great show; Chris really worked his ass off doing this show. We had dinner at the Stratosphere which was way too expensive. How about $32 dollars for 2 glasses of house wine?! And we took a road trip to Hoover dam, our first time there. It was really worth the trip out to see it!
 |
| The Luxor on our way to the Chris Angel Show |
 |
| The Stratosphere. We ate on the top of this overlooking Vegas |
 |
| Views from the top of the Stratosphere |
 |
| As we left the Stratosphere at night |
 |
| Lake Mead coming into view on our way to the Hoover Dam |
 |
| Major checkpoint to get to the dam |
 |
| This the bridge you take to bypass the dam. You can cross on the dam but it will take a long time to do it. We crossed this bridge leaving here to go to Arizona. |
 |
| The air shafts for the water intakes to the hydroelectric plants each have a clock on them. One is on the Arizona side with Arizona time and the other had Nevada time. |
 |
| The Reservoir side of the dam |
 |
| Lake Meade |
 |
| The electric line coming out of the hydro plant. The crane is the last remaining crane from the construction of the dam. They still use it! |
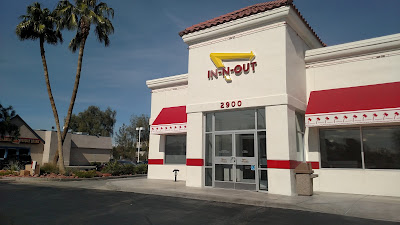
A few lessor things we did while in Vegas, ate our first IN-N-OUT burger and fries. By far the best burger and fries we have had at at a fast food place. We both have had better burgers and fries at mom and pop places everywhere in the country. But, for a consistent burger and fries in an unknown place and you are jones'n, IN-N-OOT is the place.
 |
| The place is extremely clean! It seemed to me that they have way too many people working though. We counted 22 workers at around 2 in the afternoon and the place was just a quarter full. |
 |
| The burgers looked just like the advertisements. |
We also did a day of walking around to see the strip sights and some shopping. We can get some really good deals on logo shirts here on the strip.
 |
| You get a reservation on the ferris wheel for drinks. |
 |
| This car was at our RV Park |
 |
| This sign was all over Vegas |
 |
| Tried to get a picture of where the asshole shot from but it was behind the sign. It is covered with gold colored wood. |
 |
| The memorial for the victims of the shooting. |
 |
| The memorial, with the sign and Mandalay Bay in the background |
I also repaired the shower stall floor in the RV. We noticed that the floor was getting wet to one side of the shower with no good reason for it. I took a very bright flashlight and examined the plastic shower floor. I found that the side we ten to stand on had several cracks that were still very tight but would open up when we stood on them.
 |
| Floor before repair |
 |
| Cracks are just barely visible here |
This is the second time this has happened. The first time was just at the end of our 2 year warranty and we had the floor replaced. We are now 3 years later and this shower floor has cracked.
We have an extended warranty on the RV that will cover this sort of repair with just a $50 deductible. The only issue with this is that the repair facility needs to see the issue and get it approved by the warranty company before ordering the shower floor. Then, after a few weeks, they can install it. This doesn’t really work while we are traveling. Our warranty is not over until the middle of 2018 so we can wait if we want or just fix it and decided later. We decided to fix it and wait and see if we want to go through the hassle of having it replaced later.
There seems to be 3 main ways of fixing this sort of shower floor on YOUtube. How did we manage before YOUTube?! There is the use of a fiberglass repair kit, a bonding sort of fix, and then there is the use of a rubber paint on coating.
After watching all three of these fixes, some by multiple people, I decided to go with the paint on rubber coating. The main reason I picked the paint on rubber coating is that it promised the best after finished look. The other methods would leave an area that looked repaired. With the paint-on coating, I could cover the entire shower floor surface making it look like it was always like that. And by coating the entire floor I could make sure I didn’t miss any cracks that were just starting.
While watching the videos I learned that RV manufacturers use Styrofoam under the shower floor to provide a nonabrasive surface that wouldn’t bind the floor while moving. The bad thing about the Styrofoam is that it takes a set after many uses and allows the floor to deflect while standing on it. I think this is how the cracks form in the first place. We had noticed that after the replacement 3 years ago that the floor was much firmer than it was before the replacement. And now, after 3 years, the floor was again flexing like the first floor did before it was replaced. A suggestion from one of the videos that I liked was to fill the new void in the Styrofoam with expanding insulation foam from a can.
OK, so now I have a list of things to purchase at the local Home Depot. I purchased the “as seen on TV” Flex Seal for the rubber coating. I also got a can of medium expanding insulation foam in a can. The total cost was $40 for the items needed to make this repair.
Before we left to get the coating and the foam, I cleaned the floor extremely well. I wanted the floor to be as clean as it could be and dry by the time we returned from the store. The first thing I did was to use the expanding foam. I put the long tube from the aerosol can into the crack and filled it until I could see foam coming back at me. I moved the tube around several times to make sure I filled the void as much as possible. After putting in the foam, I put our large cutting board with weights on top for the newly foamed floor. This was done to level the floor after the foam was in. The foam actually raised the floor a bit.
After the floor was set, about 2 hours, I started the rubber coating process. This was really very easy. The rubber coating is very thick but it goes on very evenly as it was self-leveling. I coated the entire matte surface of the floor so it would look like it was made that way. The finished product came out really great! The coating needed 24 hours to cure before use. There was a light chemical smell while it cured but not real bad. Just to be sure we opened the vent in the bathroom and our bedroom windows while we slept during the cure process.
 |
| Finished product! |
That is it from Vegas! We are headed to next to Tucson Arizona.
Stay Tuned!


No comments:
Post a Comment